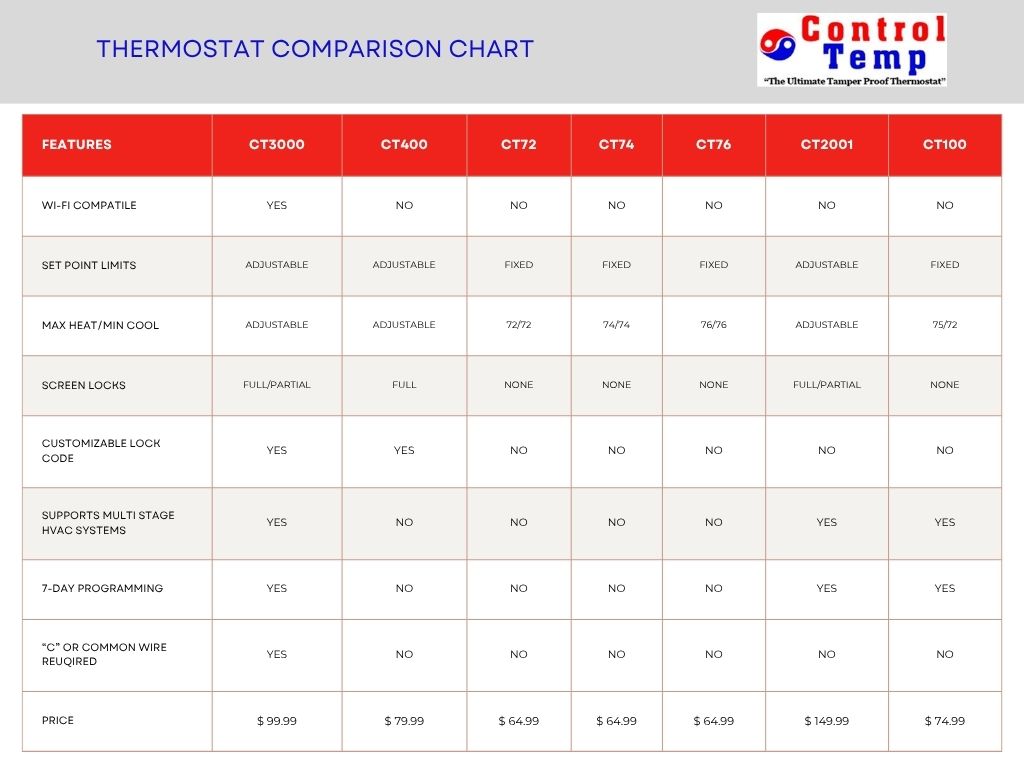
Thermostat Comparison Chart


How to program/change the schedule for your CT2001 Deluxe Tamper Proof Thermostat:
1.) This can only be done when the thermostat is in the Unlocked Setting. If the thermostat is not unlocked, you will need to unlock the thermostat. Please consult your Owner’s Manual to unlock your thermostat.
2.) Press “Sched” on the bottom of the screen.
3.) Press “Edit”. You should see “Mon Tue Wed Thu Fri” in the upper left corner of the thermostats. If you do not, press “Prog Day” on the right side of the screen until you see all 5 days listed on the top of the screen.
4.) Press Wake. You will be able to change the time, the heat and cool settings here by using the up and down arrow keys by each option. The fan setting can be programmed to On, Auto, or Circ for each period as well. For more on the Fan Schedule consult your Owner’s Manual.
5.) Press Day to change the next period.
6.) Press Evening to change the next period
7.) Press Sleep to change the next period.
8.) If you do not need all 4 periods, you are able to press “Cancel Period” for any period necessary.
9.) To program “Sat Sun” press “Prog Day” and you will see “Sat Sun” on the top left corner of the thermostat.
10.) Repeat Steps 4-7 to program the weekend schedule.
11.) If you need to program a specific day or each day differently, press “Prog Day” until you see the day that you want to program and then repeat steps 4-7 to program each day.
12.) Once you are finished programming the schedule, press Done.
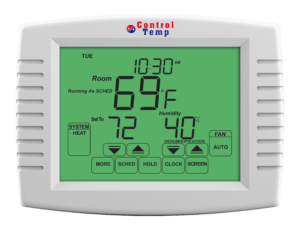
You will see “Running As Sched” above the system box when the thermostats is using the schedule to operate the thermostat.
If you have any questions or concerns, please feel free to reach out to us at info@controltempthermostats.com or at 866-792-2022. Please make sure to have your order information (invoice number/order id) available when contacting us. We do not give out information on the CT2001 unless we can confirm that you are the owner of the thermostat.


Thank you for choosing ControlTemp Thermostats for your heating and cooling needs.
Our thermostats are very easy to install. They use the same wiring configuration as your old thermostat. Below are easy step by step instructions as well as a video on how to install your thermostats.
How do I install my thermostat?
You, your handyman, a licensed HVAC contractor, electrician, or your property management service department can install it according to the instructions provided with the product. We have designed this product for easy installation. Our thermostats install just like a regular thermostat, requiring only the connection of 4-5 wires.
Our Owner’s Manual, which accompanies your unit, includes complete details on how to install and program your thermostat.
Step by Step Guide to installing your thermostat:
Installation Video
Want to see a “This Old House” video on how to install your programmable thermostats? Click here
Other Questions
If you have any support questions, please contact us at 866-792-2022 or email us at info@controltempthermostats.com. Please have your order information (invoice number/order id) available when contacting us.